What if I said you could do fewer reps, fewer sets, and spend less time in the gym, all without sacrificing results? Normally a claim like this would fall into the "too good to be true" category, but not this time! The scenario I just laid out for you is exactly what you'll get by implementing Rest Pause Training.
What is Rest Pause Training?
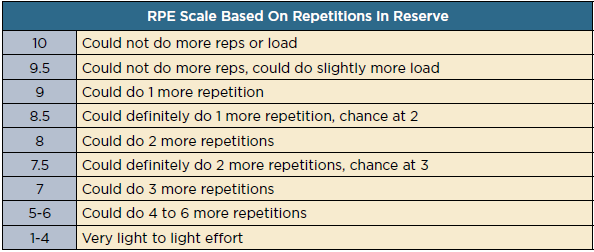
The easiest way to explain Rest Pause Training is to use an example. Let's say you're doing a set of 10. Pick a weight that would put you approximately two reps from failure when you hit the 10th rep. For those of you who are familiar with the RPE scale, this is an RPE 8. (I've listed the RPE scale below in case you're curious.)
You initiate the set just like any other "normal" set; however, after the 10th rep, you will take a three-second rest (or pause) followed by three more reps. Repeat this for three additional sets. You should be about one rep from failure at the end of each additional set.
You don't necessarily have to do 10+3+3+3. You can add more sets onto the end. There are two rules here:
Do no more than five additional sets. If you can do more than five, the weight isn't heavy enough.
Example: 10+3+3+3+3+3
If you "lose" a rep on an additional set, you stop.
Example: 10+3+3+2
You can also raise or lower the number of reps on both the initial set and/or the mini sets that are tacked on at the end. I wouldn't advise going lower than 5 on the initial set, because if you go heavier than that, you likely won't be able to do any additional reps at the end. I also wouldn't advise going above 20 reps for reasons we will discuss later in this article.
How are these better than regular sets?
In order to explain the benefit of rest pause sets, I first need to explain what an "effective rep" is. As the name implies, an effective rep is a rep that is more effective at building muscle. Let's say you're doing a set of 10 using a weight that will put you at failure at 10 reps. Even though you end up at failure by the end of the set, the first half of the set isn't all that hard. In other words, the reps from the first half of the set wouldn't be as effective as the reps from the second half.
Here's where rest pause sets come into play. By only resting a few seconds before performing more reps, you're ensuring you stay close to failure. This means you'll be getting more of these effective reps. Because of this, you can do less total reps, while getting the same result.
Now that the theoretical stuff is out of the way, let's get a little more practical. How does this work out in practice? Let's put this into numbers. Reps performed after the initial set are worth approximately 3 standard reps. For example, looking back at our initial example of 10+3+3+3, those extra 9 reps are equivalent to 27 standard reps.
A beginner could sufficiently train an entire muscle group with just two sets using this method and an intermediate or advanced lifter could achieve this with just three to four sets. Now, do you see how this is such a powerful time-saving tool?
What's the catch?
I know this sounds like sunshine and rainbows, but of course, there is a catch, or two.
Let me explain why you shouldn't go over 20 reps for your initial set. Remember, what makes this strategy so efficient is having so many reps close to failure. If you lower the weight too much, it will take longer to get close to failure on both the initial set and the additional sets, meaning less of the reps you do will be effective reps.
The second catch is that more complex lifts, such as squat, front squat, deadlift, snatch, power clean, etc. shouldn't be performed using this method. These movements require a higher degree of technical skill to be performed safely. As we wear ourselves down, we begin to lose the ability to perform these lifts with proper form, dramatically increasing risk of injury. A good solution to implement here would be to do your heavy compound lifts using regular/straight sets and using rest pause sets on your secondary/isolation lifts.
I have one final note before moving on to a couple of example workouts. In order to continue getting bigger and stronger muscles, you will still need to increase the weight you are lifting over time.
How to Implement Rest Pause Sets
Below, I've listed two lower body workouts. One that includes more technically advanced exercises and one that does not:
Example Workout 1
Barbell Squat:
4 sets of 5Barbell Deadlift:
4 sets of 5Leg Extension:
2 sets of 10+3+3+3+3+3Seated Hamstring Curl:
2 sets of 10+3+3+3+3+3Standing Calf Raise:
2 sets of 10+3+3+3+3+3
Example Workout 2
Leg Press:
2 sets of 7+2+2+2+2+2Machine Hack Squat:
2 sets of 7+2+2+2+2+2Leg Extension:
1 set of 15+5+5+5+5+5Seated Hamstring Curl:
1 set of 15+5+5+5+5+5Standing Calf Raise:
1 set of 15+5+5+5+5+5
Remember not to get too bogged down in the numbers I've shown in these two example workouts. I mainly wanted to give you an idea of what different sets and reps might look like using this method. If you'd like to learn more about this or other training methods, click on the contact form and send me a message or send me a message on Facebook!
Thank you so much for reading! If you enjoyed this article, you'll also enjoy the video I attached below. In this video, I touch on rest pause sets as well as other great time-saving strategies for the gym. If you like what you see, consider subscribing! I post new YouTube videos every Tuesday and Thursday. I will be back here next Sunday. As always, God bless you AND your family and I'll see you next week.
Further reading: Borge Fagerli first popularized this training model in 2006 and calls his version of it myo-reps. If you'd like to read more on this topic, you can read his article here.
References: